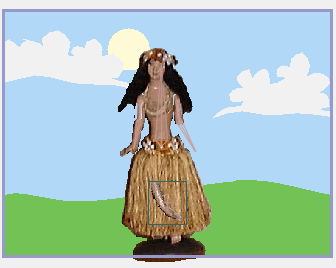
Starting point for this tutorial.
This tutorial introduces another type of layer in Moho: Image Layers. Image layers are a way of including artwork created in other programs in a Moho project. Any application that can produce image files can be used with Moho: photo editors, 3D modeling programs, natural media painting programs, the list goes on...
An image layer in Moho contains a single image file that can be used as a background, or combined with a bone layer to build a character. Although they're called "Image" layers, an Image layer can also make use of a movie file as its source. Image layers and vector layers can be mixed and matched in the same project.
You'll notice that the images used in this tutorial do not appear rectangular. This is because they make use of an alpha channel to mark some parts of the image as transparent. We recommend using PNG images with Moho because they support full alpha channel transparency. You'll need to use an image editing program (like Adobe Photoshop) to create images with transparency.
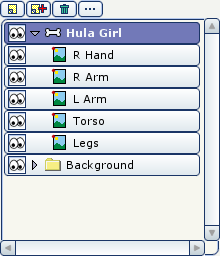
For this tutorial, we'll start with a project file that's almost finished. It's named "Tutorial 4.1" and it's located in the "Tutorials/4 - Images" subfolder within the main Moho folder. Open this file in Moho, expand the "Hula Girl" layer in the Layers window, and you should see something like this:
Starting point for this tutorial.
This project is almost complete as it is. The only thing that's missing is the dancer's left hand. Add the hand as follows: First, click on the layer named "L Arm" (we want the new layer to be just above the left arm). Next, click the new layer button  in the Layers window to create a new layer. In the popup menu that appears, choose "Image". Moho will prompt you to select an image file. Choose the file "l_hand.png" in the "Moho/Tutorials/4 - Images" folder. Double-click the new layer and rename it "L Hand". At this point, your Layers window should look like this:
Left hand added.

New image layers are centered in the workspace, so the dancer's hand is not yet properly aligned:
The new hand.
To position the arm properly, use the Translate Layer tool to drag the left hand into position at the end of the left arm. Allow for a little overlap between the two parts at the elbow:
Left hand in position.


The last step is to attach the new part to the dancer's skeleton. Select the Bind Layer tool, and click on the lower arm bone on the dancer, as shown below:
Bind the image layer to the forearm.

You're done! To see the animation in action, press the Play button. Of course, we skipped over the process of building and animating the skeleton, but the basics of working with skeletons were covered in previous tutorials - all of that information applies when using bones with image layers.
The final result.