Starting point for this tutorial.
This tutorial is more of a show & tell than a hands-on creation of an animation. We will demonstrate some examples of a powerful feature of Moho - layer masking. Layer masking can be used for all kinds of effects such as shadows, compositing, depth effects, transitions, and to simplify certain modeling and animation tasks.
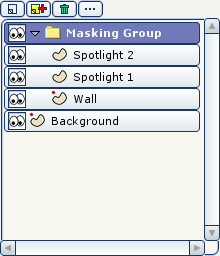
For this tutorial, we'll start with a project file that's almost finished. It's named "Tutorial 2.6" and it's located in the "Tutorials/2 - Drawing" subfolder within the main Moho folder. Open this file in Moho, expand the "Masking Group" layer in the Layers window, and you should see something like this:
Starting point for this tutorial.
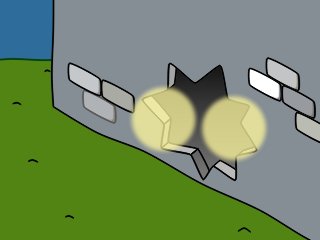
This is a simple scene of a wall with a hole broken through it (a jailbreak maybe?). Set the current time to frame 24, and choose the File->Render menu command. Notice how the spotlights spread across the hole as if it were a flat object as shown below:
Spotlights shining across the hole.
To make the spotlights more realistic, we can use Moho's masking feature. Double-click the "Masking Group" layer. In the Layer Settings dialog that appears, go to the "Masking" tab and set the "Group Mask" setting to "Hide all" as shown below and click OK.
Mask setting for the "Masking Group" layer.

In the editing view, you'll notice that the wall and spotlights have disappeared from view. This is because the masking mode we just set hides all objects in the group - we've got a bit more work to do:
Everything in the group is hidden.
The next step is to define which parts we actually want to see. Double-click the "Wall" layer to bring up the Layer Settings dialog. In the Masking tab, set the "Layer masking" value to "+ Add to mask" as shown below and click OK:
Mask setting for the "Wall" layer.

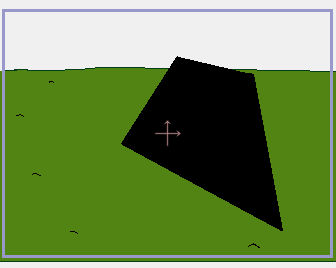
What we've done is tell Moho to add the contents of the Wall layer to the visible region of all objects in the group. No other layers in the same group will be allowed to draw outside this visible region (the mask). If you temporarily turn off the "Background" layer, you'll see that there is an actual hole in the wall. Because the wall acts as a mask, the spotlights cannot draw themselves in this area. You're welcome to render out the entire animation as a QuickTime movie to see the full, animated effect.
The wall acting as a mask.

Now open the file "Tutorial 2.6_2". Take a look at the masking group in this project (in this case, the masking function is already turned on). In this example, the eyes are used as a mask, and the eyelids are forced to render themselves only inside the eyes. This makes it much easier to construct and animate the eyelids, without having to worry about them spreading outside the eye region - with a mask layer, they can't.
Finally, open the file "Tutorial 2.6_3". This project uses a mask layer to cause a text object to fade into existence. Play back the animation, or export it as a QuickTime movie, then play back the movie. In this example, a variation of the masking feature is used: the mask itself doesn't have to be visible. In this case, the mask is a rectangle that gradually exposes the text, but we don't really want to see the rectangle. To use an invisible mask, the Mask layer uses the "+ Add to mask, but keep invisible" option in the Masking tab.