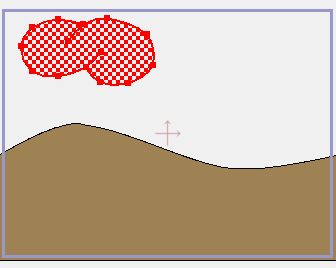
Starting point.
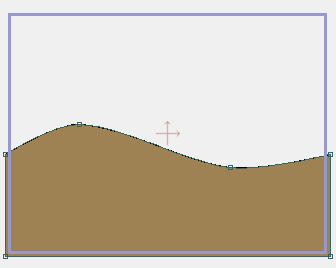
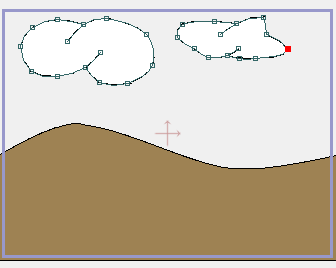
This tutorial follows on the previous one, and teaches you how to draw more complex shapes. You can either continue with the project you created in Tutorial 1.2, or you can open a file provided for you named "Tutorial 1.2". This file can be found in the "Tutorials/1 - Basics" subfolder within the main Moho folder. The file you're starting this tutorial with should look something like the following:
Starting point.
Click the New Layer button  in the Layer window to create a new layer. In the popup menu that appears, choose "Vector". Double-click this new layer and rename it "Clouds".

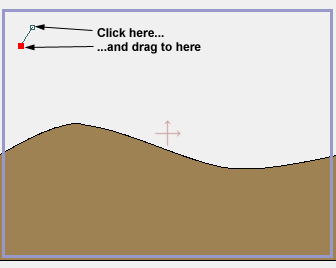
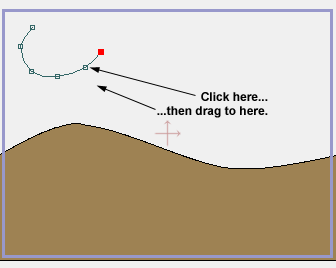
Now select the Add Point tool then click and drag to create the line segment below:
Add a line segment.
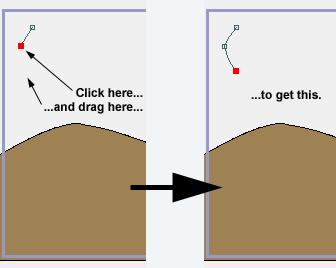
Next, click on the end of the new line segment and drag to stretch the curve out like this:
Add another segment to the end of the curve.
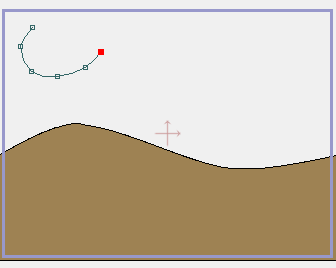
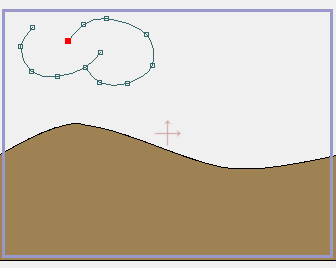
Do this a few more times until you have the curve below:
Several more segments added.
The key point to remember is in order to extend a curve, you need to click on one of its endpoints and then drag the mouse to where you want the new point to be. Remember, if you make a mistake at any time, just choose the Edit->Undo menu command.
Now we're going to introduce the concept of "welding" two points together. Welding joins two points into one. Welding is used to close a curve into a loop or to join two curves in sort of a branching structure. We're going to start a new curve that is welded to the one we just created. In this case, we'll let Moho do the welding automatically. First, make sure that in the tool options area, the "Auto-weld" checkbox is turned on. Click on the second to last point in the curve, and drag down and to the right, as shown below:
Where to add the new curve segment.
When you use the Add Point tool on a point that is in the middle of a curve, what happens is that you start a new curve that is automatically welded to that point in the first curve. These two curves are permanently joined at that point, which becomes important when we get to filling the shape with color. Here's what your project should look like after adding the new curve segment:
A new segment welded to an existing curve.

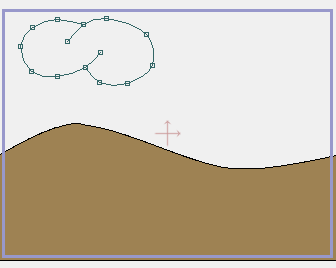
Add some points to the end of this new curve to get the shape below. Remember, to add a point to the end of a curve, click just on the last point of that curve.
More new points.
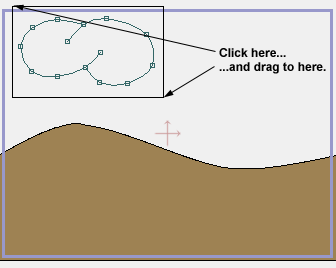
Finally, add two more points at the beginning of the original curve. When you add the last point, drag it over to the right and line it up with the next to last point of the second curve before letting go of the mouse. Moho will automatically weld those points together to get the final shape below:
Finished cloud.
Sometimes it can be hard to follow this sequence of steps - let's take a moment to watch a movie of the cloud being created in Moho. Pay special attention to where the mouse is clicked in order to weld the two curves together.
Press the play button to watch how to draw the cloud.

Filling the cloud with color is the same basic procedure as coloring the hills. First, activate the Create Shape tool. In the main window, click and drag a rectangle around all the points in the cloud. If you miss some points, you can either try again, or choose Edit->Select Connected to select the rest of the cloud.
Select the shape to be filled.
When you let go of the mouse, the entire cloud should be selected, and should look like this:
The selected shape.
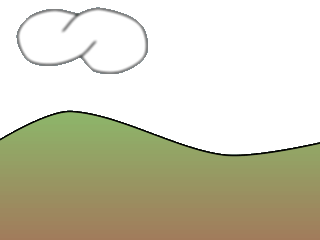
Now the highlighting looks correct, so press the spacebar to activate this fill. We'll just stick with the default fill color of white and outline color of black, so there's no need to modify the colors. However, we will add a line effect to make the cloud a bit softer. In the Style window, select 'Soft Edge' from the Line Effect pop-up menu. Now would be a good time to select the File->Render command to see what your final result looks like:
The rendered cloud.
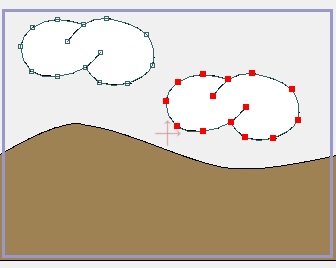
Let's make another cloud. Choose Edit->Select All from the menu. Now choose Edit->Copy, followed by Edit->Paste. Next, pick the Translate Points tool from the toolbar. In the working area, click and drag to the right to move the new cloud away from the original. (When you paste an object from the clipboard, it is positioned directly on top of the original.)
Duplicated cloud.

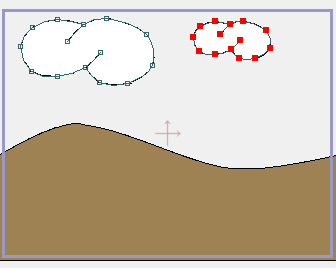
Use the Scale Points tool to resize this new cloud, making it smaller than the original. The Scale Points tool can resize an object both vertically and horizontally. In this case, we don't really want to change the cloud's shape like that. With the Scale tool active, click and drag inward on one of the corner handles that appears around the cloud, thus making it smaller without changing its overall shape. Continue using the Scale Points and Translate Points tools until you get the new cloud in a position you like.
Second cloud scaled down and positioned.
Next, use the Edit->Select None command (or press the enter key) to de-select all the points in the new cloud. Pick the Translate Points tool again, and this time click and drag on individual points of the second cloud. In this case, since only one point is selected at a time, the Translate tool is used to re-shape the cloud, not move the entire object. Just re-shape a few points here and there so that the two clouds don't look exactly the same.
Modify some points.
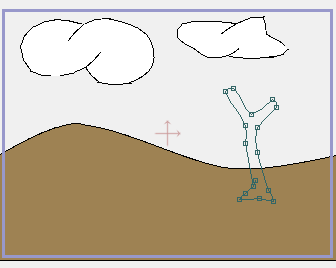
Good - we're moving right along, but this scene needs some plant life. Add a new layer to the project by clicking the new layer button in the Layer window. Again, choose "Vector" from the popup menu. Double-click this new layer and rename it "Tree".
Using the Add Point tool, along with the welding feature, draw a shape that resembles the trunk of a tree. Here are a few things to remember as you go: First, you can always use the Edit->Undo command to back up if you make a mistake. Second, you can switch to using the Translate Points tool to reshape part of the object, even if you haven't finished drawing the whole thing yet. Third, the Translate Points tool lets you pick individual points by clicking on them - if you want to get rid of a point, but it's too far back to use undo, select it with the Translate Points tool and press the backspace or delete key on your keyboard.
Feel free to be creative with your tree trunk, you don't really have to stick to the sample below.
Draw a tree trunk.
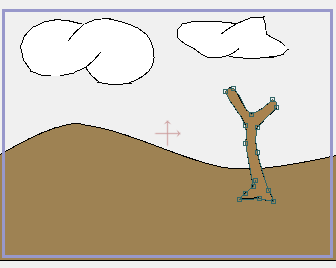
Go ahead and fill the tree trunk with color, using the same technique as you used on the cloud.
The colored tree trunk.


There are a few tools that may be useful when building your tree that haven't been introduced yet. The Pan Workspace and Zoom Workspace tools can be used to move around the workspace. Note that these tools are not used to manipulate your drawing - they just let you move your view so that you can focus in on a particular area of interest. To reset your view to its original position, select the View->Reset command from the menu bar.

Another useful tool is the Curvature tool. Using this tool, you can click and drag on a point to adjust how round or pointy the curve is as it passes through that point.
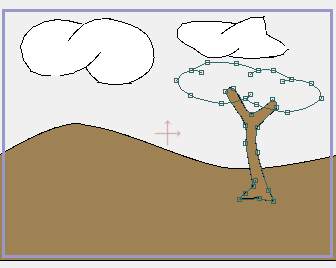
The last thing we'll add in this tutorial is some greenery to the top of the tree. The shape for the treetop will be similar to the clouds, so follow similar steps to create it, but there is one tricky part. Because the treetop overlaps the trunk of the tree, it can be easy to click on the wrong part and add a new point to the trunk instead of the treetop.
There are two ways to avoid this problem. One, use the Pan and Zoom tools to move in close to the top of the tree so that it's easier to avoid clicking on the wrong thing. The second approach is to draw the treetop off to the side where there's plenty of empty space. Then, when the treetop is finished, drag it back into position at the top of the tree. For the second approach, when you're ready to move it back into position, use the Translate Points tool and click to select one point on the treetop. Then use the Edit->Select Connected command to select the rest of the treetop. Finally, drag the treetop into place, and use the Scale Points tool to resize it if necessary. Here's the kind of look we're going for with the treetop:
The treetop.
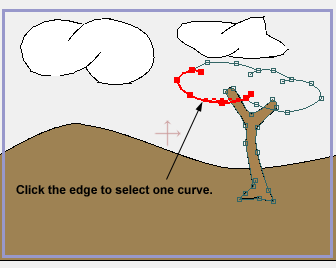
The final step is to color the treetop. We'll use a slightly different technique to fill in the treetop than we used for the clouds and trunk. The tree is a bit more complex than the clouds - by using the Create Shape tool to drag a rectangle around the treetop, you would probably also select the upper part of the trunk. But there's an easier way to select the treetop. Using the Create Shape tool, just click on the edge of the treetop as shown below, and the corresponding curve will be selected, as shown below:
Click to select a curve.
To select the rest of the treetop, just choose the Edit->Select Connected menu command (or press the tab key). When the rest of the treetop is selected, you're ready to fill it:
Select the rest of the treetop.

When you have the treetop selected, hit the spacebar. In the Style window, pick a nice leafy green as the fill color. Set the "Line width" of the treetop's outline to be 4, nice and thick - you'll see why next.

Choose File->Render to see how the treetop looks. Notice how the ends of line segments look kind of squared off and blocky. We'll fix that using Moho's variable line width feature. Press Enter to de-select all points. Now, using the Line Width tool, click on each of the points in the treetop that is at the end of a line segment. Choose File->Render again, and notice how the endpoints are now nicely tapered. This feature isn't limited to endpoints - experiment with using it on other points along a curve. Also, try dragging the Line Width tool back and forth to make lines thinner or thicker.
Changing line width.

The next tutorial will move into using bones to control a character, and you'll learn how to set up some animation controls to make things move.
The completed background.
