Moho's interface.
The Moho interface has various windows that are used for controlling different aspects of a Moho project. In this chapter we'll briefly describe some general components of the Moho project window. The more complex parts of the Moho interface, such as the Layers window, have their own chapters that follow this one. Although this chapter will describe how the main window works, it won't go into detail about creating a drawing or animation. For that, please refer to one of the chapters in the section entitled Using Moho.
Moho's interface.
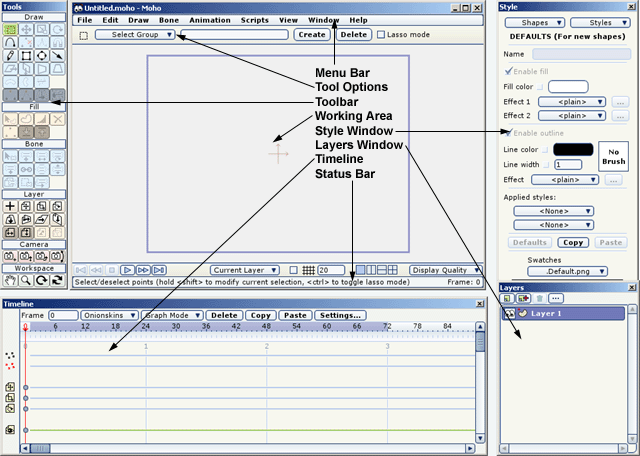
Most of the Moho project window is taken up by the working area. This is the region where you will create and view your drawings and animations. In every project, even an empty one, two items will be displayed in this area. The first is a cross marking the center of the currently active layer. The second is a blue rectangle that indicates the visible region of the project. Only objects that are within this rectangle will appear in your final animation.
Although every project has a fixed image size (for example 640x480 pixels), the working area is basically an endless flat space on which you can draw and animate. The blue visibility rectangle mentioned above indicates the actual image area for the project. While working, you may want to zoom in or out to see more or less detail in your project. A quick way to do this is by using your right mouse button. By dragging the right mouse button in the working area, you can move around from side to side. If you hold down the shift key while right-dragging, you can zoom in and out. If you want to restore a reasonable overall view in the working area, press the Escape or Home keys, or choose Reset from the View menu.
The background of the working area is usually just a blank color, but if you drag an image file into the working area, it will appear in the visibility rectangle. This is a helpful feature meant to allow you to trace the image with the drawing tools.
The real work that happens in the working area is not covered here, but is described in the Using Moho chapters.
The toolbar to the left of the main Moho window is where you select which tool you want to work with. The available tools will change depending on whether you're currently animating, which objects are selected, and what type of layer is currently active. The purpose and use of each tool is described in the Using Moho chapters, and isn't covered here.
The status bar along the bottom of the Moho window displays a short description of the currently active tool in the toolbar. If you don't know what a tool does, the best thing is to read this manual. However, if you just need a quick reminder, the status bar can be helpful.
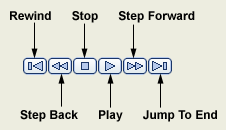
Near the bottom-left of the main Moho window are a set of playback buttons that allow you to play/stop/rewind/etc. your animation.
Playback controls.
Near the bottom-right of the main Moho window is a popup box that lets you customize the level of display quality in the editing area. The Display Quality popup lets you control the following options. Note that this only applies to the editing view - when rendering your final project, everything will be drawn in full quality, regardless of the following settings.
A little way to the left of the Display Quality popup is another popup box labeled "Current Layer". This popup contains similar options to those found in Display Quality. The options in "Current Layer" apply only to the current layer, while "Display Quality"'s options apply to the entire project. So, for example, if you wanted to display fill shapes for all layers except one, you would leave "Fills" turned on in the Display Quality popup, but turn it off in the Current Layer popup for the layer in question.