A skeleton hierarchy.
Bone layers are similar to Group layers - they can both group together multiple sub-layers that can then be manipulated as a single object. However, bone layers have an additional feature: In a bone layer, you can set up a skeleton that can be used to manipulate your artwork. A skeleton is exactly what it sounds like - an internal structure that can move the outer, visible portion of your artwork.
Setting up bones is sort of a pre-animation phase. You don't draw shapes in Bone layers, you set up controls that will help you animate later on. The purpose of setting up bones is exactly what you might think: creating a rigid skeleton inside your drawing. Later on, during animation, when you want to move an object, bones make the job easy. By moving a single bone in the arm of a character, for example, the whole arm will move with it. Around the elbow, the drawing of the arm will bend and stay smooth (as long as the bones were set up well with the Bone editing tools).
Bones by themselves don't really do much of anything: you can move them around, but they're invisible in the final Moho output. To really make use of bones, they need to be attached to objects in other layers. This process is covered in the Tutorials section, and also the section on Bone tools.
When you create a skeleton out of a group of bones, the bones have a hierarchical relationship. Each bone has a single parent (or maybe no parent at all, in which case it's called a root bone), and each bone may have multiple children. The relationship between parent and children is that when a parent bone is moved, all of its children move with it. When a child bone is moved however, it's parent remains unchanged.
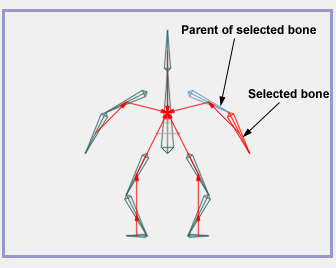
Below is a picture of a skeleton created in Moho. Red arrows have been added that point from each bone to its parent (the spine has no parent and is referred to as the root of the skeleton). Note that the currently selected bone is highlighted in red, and its parent (if it has one) is highlighted in blue, as shown below.
A skeleton hierarchy.
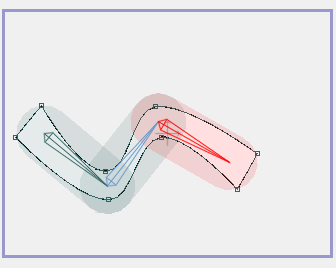
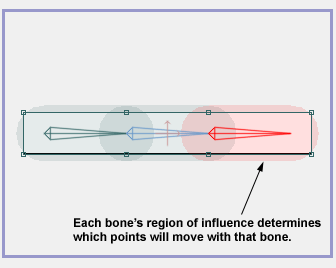
When you use bones with a vector layer, you need to consider how the bones and curve control points will interact. When a bone moves, it moves the points around it as well. Each bone has a region of influence (which you can adjust). Points move mostly with the bone whose region of influence they fall within, although other bones can still have an effect on them. Below is a picture of some points and bones. Notice the region of influence around each bone. The second picture shows the same object after the bones have been moved. Notice how the points follow the bones according to regions of influence (and how the curves pass smoothly through the points, wherever they move to).
A bone and vector setup.
Moving bones moves the curve control points.