The Moho timeline.
The Timeline window is used when animating in Moho to control the current time, and to control objects' keyframes.
The Moho timeline.

The Timeline window only displays information about the currently active layer in the project. When you switch to a new layer, the timeline panel will update its display to show the new layer's keyframes.
The top of the Timeline window has controls for setting the current time. Whenever you modify an object in Moho, the modification is recorded at the current time. The process of modifying an object, changing the time, and modifying it again is how an animation is created in Moho. Time in Moho is expressed in terms of "frames", where there are x number of frames in a second. By default, a new Moho project has 24 frames per second, although this value can be adjusted in the Project Settings dialog.
The first set of controls for adjusting time is a set of VCR-like playback buttons. (These are actually at the bottom of the main window, not in the Timeline window itself.) From left to right these buttons are: rewind, step back, stop, play, step forward, and jump to end.
Playback controls.
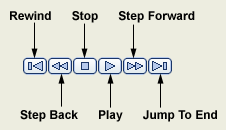
Rewind sets the current frame to 0, while jump to end sets the current frame to the last one in the animation (the length of the animation is defined by the shaded area in the time ruler). The step forward and back buttons advance and back up by one frame. The play button plays back the animation in the main editing area, repeating playback in a loop. Finally, the stop button stops playback.
At the top-left of the Timeline window is a text control that indicates the current frame number. You can change the current frame by typing in a new value here and pressing enter.
Directly below the frame field is a sort of ruler that measures time. This time ruler has small tick marks, one per frame, and has labeled frame numbers at intervals along its length. The time ruler also displays the current frame with a red triangular marker above the current frame's tick mark. The time ruler is used both as an indicator of the current time, as well as a control to adjust it. By clicking (or clicking and dragging) anywhere on the time ruler, you can change the current frame.
A certain range of frames in the time ruler are shaded with a darker color. This shaded region indicates the length of your animation. When you play back your animation in Moho or export it as a movie file, this shaded region is the part that will play back. You can change the start and end frames of your animation in the Project Settings dialog, or you can <alt>-click in the time ruler to set a new start and/or end time. <alt>-Click with the left mouse button to set the start of your animation, and <alt>-click with the right mouse button to set the end.
Next, just below the time ruler, is the onionskin controller. It has tick marks that line up with the frames in the time ruler. By clicking one of these tick marks, you can turn on an "onionskin" frame. An onionskin frame appears as just an outline superimposed on the current frame, and is used to compare your animation at two different times at once. This is helpful for lining up certain complex motions. Click an onionskin marker again to turn it off. If you turn on the "Relative frames" checkbox in the Onionskins popup box, Moho will move the onionskin frames along with the current time so that they maintain the same relative distance from one another. You can also turn on the "Selected layer only" checkbox to tell Moho to display onionskins for just the currently active layer. Moho can display up to 8 onionskin frames.
Sometimes, you may want to play back just a short segment of the timeline, instead of your entire animation. For example, you may be working on one small move, and you want to play it back over and over while you make small changes to see when you've got it just right.
To set a limited segment of the timeline for playback, hold down the <ctrl> key while you click in the time ruler. Click with the left mouse button to set the beginning of the segment, and click with the right mouse button to set the endpoint. To remove the limited playback segment, <ctrl>-click on the segment endpoints to remove them from the timeline.
Most of the timeline panel is taken up with animation channels, drawn as horizontal bars below the time ruler. Each animation channel displays a certain type of motion or effect that can take place in a Moho animation. Different types of layers have different animation channels available. For example, vector layers are the only ones with a point animation channel, and bone layers are the only ones with bone animation channels. At the left end of each animation channel is a small icon that indicates what type of channel it is. Shown below are the icons for the various types of animation channels. Note that the red-colored channel icons represent animation for the currently selected object. (If you're ever unsure about which channel an channel icon refers to, just hold your mouse over it momentarily for a tooltip reminder.)
Note: To help reduce visual clutter, not all animation channels have to be displayed at once in the timeline. For example, you won't often have to refer to the Layer Shading channel in the timeline. To turn channels on or off, click the "Settings..." button in the timeline. Hidden channels are still doing their work behind the scenes, they just aren't displayed in the timeline.
Animation channels.
| Icon | Channel Type |
| |
| Layer Motion Channels | |
 | Layer Translation |
 | Layer Scale |
 | Layer Z Rotation |
 | Layer Y Rotation |
 | Layer X Rotation |
 | Layer Horizontal Flip |
 | Layer Vertical Flip |
 | Layer Shear |
| |
| Layer Effect Channels | |
 | Layer Visibility |
 | Layer Blur |
 | Layer Opacity |
 | Layer Shadow |
 | Layer Shading |
 | Layer Motion Blur |
| |
| Camera Channels | |
 | Camera Tracking |
 | Camera Zoom |
 | Camera Roll |
 | Camera Pan/Tilt |
| |
| Vector-Only Channels | |
 | Point Motion |
 | Selected Point Motion |
 | Point Curvature |
 | Selected Point Curvature |
 | Fill Color |
 | Selected Fill Color |
 | Line Color |
 | Selected Line Color |
| |
| Bone-Only Channels | |
 | Bone Angle |
 | Selected Bone Angle |
 | Bone Translation |
 | Selected Bone Translation |
 | Bone Scale |
 | Selected Bone Scale |
 | Bone Lock |
 | Selected Bone Lock |
| |
| Switch-Only Channels | |
 | Switch Layer |
| |
| Particle-Only Channels | |
 | Particles On/Off |
Along the length of an animation channel are displayed keyframes. A keyframe represents a point in time at which you, the animator, made a modification to an object. For example, if you set the current time to frame 24, then scale the layer, a keyframe will appear in the layer scale channel at frame 24. Keyframes appear as small markers on the channels. At points in time that lie in between keyframes, Moho automatically calculates how to move an object from one keyframe position to the next.
Keyframes are not just static elements displayed in the animation channels. They can be moved, deleted, and copied. To modify a keyframe, first it must be selected. This is accomplished simply by clicking a keyframe in the timeline panel. A selected keyframe shows up in a highlighted color. Multiple keyframes may be selected by holding the shift key while clicking on keyframes. Alternatively, you can click and drag a rectangular selection box around the group of keyframes you want selected.
To delete selected keyframe(s), either click the "Delete" button in the timeline, or press the <alt>+<backspace> keys. Deleting a keyframe removes motion from an object. Keyframes can also be moved by dragging them forward and back in time. If you want some motion to take less time, drag its keyframe to the left. To take more time, drag it to the right.
As mentioned before, Moho automatically calculates what happens in between keyframes. However, you do have some control over this. By default, Moho will compute a smooth transition from one keyframe to the next - most of the time, this is probably what you want. However, you can change the transition type by right-clicking a keyframe and choosing a new method from the popup menu that appears. The transition methods are: smooth (the default), ease in/out (also a smooth motion, but the object starts off moving kind of slowly and slows down again as it approaches the next keyframe), linear (motion is straight from one keyframe to the next, leading to a somewhat mechanical look to the motion), step (there is no transition at all - the object just jumps from one keyframe to the next), noisy (the object moves in a slightly wobbly motion), and cycle (the value from this keyframe to the next will be taken from some earlier section of the timeline).
Another way of creating keyframes is to copy an object's position from another point in time. To do this, first select the keyframes you want to copy. Next, click "Copy" in the timeline (or press <alt>+C). Now, set the current frame to when you want the copied keyframe to appear (using the time ruler or the step forward/back buttons). Finally, click "Paste" in the timeline (or press <alt>+V) to place a copy of the keyframes at the current time.
In the "Graph Mode" popup box in the Timeline window, you can enable Moho's graph mode. In graph mode, the animation channels of the current layer are displayed graphically, rather than just as points along a line. In the example below you can see what graph mode looks like:
The Timeline window in graph mode.

The main body of the timeline is now a graph, showing the value of the animation channels as curves. The horizontal dimension represents time in frames (just as in the regular timeline mode), and the vertical dimension represents the value of the animation channels. If all animation channels were displayed at once, the graph would become too cluttered to be useful, so it's up to you which channels to display at any given time. To turn the display of a channel on and off, click its icon on the left side of the timeline. Channels that are turned on become highlighted in the color of their respective curves in the graph - in the above example, two channels are turned on: Layer Scale and Layer Z Rotation.
To further reduce clutter, only one channel can be active in editing mode at a time. The active channel's icon on the left is outlined to indicate this - here the Layer Z Rotation channel is active. Double-click a channel icon to activate it. The active channel is the only one that has its keyframes displayed in the graph - the keyframes look the same as in regular mode.
Depending on the values in your animation channels, the curves on the graph may be too large to view, or too small to work with easily. You can change the vertical scale of the graph in the following ways: First, you can set the vertical scale numerically in the "Scale" text field in the Graph Mode popup. Second, pressing the Page Up/Page Down keys will zoom in and out vertically. If you hold the <shift> key while pressing Page Up/Page Down, you can move the graph up and down. Finally, if you press the End key, the graph will automatically scale itself to accommodate the currently active channel.
In graph mode, you can still add keyframes (use the popup menu through the right mouse button), delete keyframes, and move keyframes back and forth. In addition, you can move keyframes vertically - that is, change the value of keyframes. To restrict the movement of keyframes, hold down the <ctrl> key while dragging keys to move them horizontally, or hold the <alt> key to move them vertically.
Something that will become apparent in graph mode is that some channels have more than one value for every keyframe. For example, the Layer Translation channel has separate values for X, Y, and Z translation. These values will appear as separate curves in the graph, although they have the same color. Each of these curves is thicker than the last - the thinnest curve represents the X value of the channel, the medium Y, and the thickest curve, Z.
Another thing you may notice when using animation cycling: A channel that cycles will have a repeating curve, without more keyframes after the one that cycles. This is illustrated in the above picture for the Layer Z Rotation channel.
For a hands-on example of using the timeline in graph mode, see the Tutorials section.