
I'm wondering if it is possible to use point binding (or something similar) to bind or release specific points to a bone, but keeping the soft binding the bones initially have? Using bind points binds the points to a bone like parenting a layer to a bone, there is no soft deformation anymore. And is there a good (I mean beyond the standard tutorial that comes with the program) that explains character setup?
edit: I renamed the topic because I'll probably have a bunch of questions while I go. It doesn't make sense to me to make a new topic for every one of them.
EddyWally's bunch of MOHO questions (masking)
Moderators: Víctor Paredes, Belgarath, slowtiger
EddyWally's bunch of MOHO questions (masking)
Last edited by PatrickS on Sun Mar 18, 2007 2:14 pm, edited 2 times in total.

You can bind one point to a bone, or two points or 3 etc... and all the other points still have that "flexible" binding.
There would be no way to have both types of binding for points at the same time... it's just impossible. Either a point is bound to a bone or it isn't bound to any bone or it is "flexi bound" to all bones.
You can have any mix of those combinations with all the points.
-vern
There would be no way to have both types of binding for points at the same time... it's just impossible. Either a point is bound to a bone or it isn't bound to any bone or it is "flexi bound" to all bones.
You can have any mix of those combinations with all the points.
-vern
Bone layers have 2 states: Flexible binding an Region binding. They work similar about binding points. The only difference is that in Flexible binding state ALL bones affects to ALL not released points or not rigged points. The amount of affection depends on the bone strength and the distance of the point to the bone center.
A point can have FOUR states relative to bones binding:
1) Solid rigged to a bone. Done by bind points tools and Bind points button or pressing space. The points will follow only that bone. Any other bone don't affect the point. It does not matter how far is the point from the bone, it moves as a solid with the bone.
2) Soft rigged to all the bones. If the bone layer is Flexible binding that's true for ALL the bones. If the bone layer is Region binding that's true for those bones that its strength region OVERLAPS the point. If the bone region don't overlap the point is not softly influenced (*). To put a point (or group of them) in this state, select them go to Bone menu and select Flexibind Points. Then the point moves influenced by several bones at the same time as a linear combination of the individual movement of every bone.
3) Released. The point is not attached to any bone and no bone have influence on it. To put a point in this state, select it (them) and go to Bone menu and select Release Points.
4) Solid rigged to the nearest bone. This state is automatically given to the points that have not manually obtained any of the states 1), 2) or 3) and aren't under any bone region influence. So the point is rigged as it were as state 1) but to the NEAREST bone that ever exists. I think it is only for Region Binding. It is done to avoid horphan points when you are rigging a shape with a bone that don't cover all the points with its region influence (due to the form of the shape for example)
(*) maybe in state 4) and then it is influenced by the bone but not "softly".
I hope this clarify you the bone binding understanding.
Regards
Genete
Hmmm... so the only way to have your bones "cleanly" influence your model is to pull apart the model on the zeropoint, add the bones and then on frame 1 (am I right?) bring all the different parts together again? That's pretty wack. Well... if that's the only way to go I guess I have to do it like that.
Now, I have a few more questions:
- is there an option for an orthographic camera? Or would it be possible to script something like that?
- Let's say I put a vector layer in a bone layer, draw a bone, play a little with the binding of the points but then throw away the bone and finally draw a new bone. Does MOHO somehow remember the influence of the old bone and put them on the new bone? I got that idea because it looked like that sometimes, although I didn't want it.
Thanks for the replies by the way! It's much appreciated.
That is called Bone Offset and is covered in the tuturials and help files. It is done on frame 0 (not frame 1) and is not... uh... "wack" but an incredibly powerful feature.Hmmm... so the only way to have your bones "cleanly" influence your model is to pull apart the model on the zeropoint, add the bones and then on frame 1
You build your character "apart" or pull it apart after construction. Then place the bones then click the offset bone tool and put everything back together. On frame 0 it looks odd, but all other frames use the offset.
You need to think past the weird aspect of "pulling the character apart". Of course this is true but it makes sense. How else could you define the bones control over one point or another?
If 2 sets of 3 bones (arms with a hand) are right next to the mesh of the body which has 3 or more bones... who wins control over the mesh?
By offsetting the arms you have more control possibilities.
I love this feature myself.
--------
If the bone that was deleted and the new bone have the same "ID" in AS then the points "may" still be applied to the new bone. This is a "crap shoot" so to speak. It would only happen if you delete and create a bone that is the last bone in the "list". AS gives each bone an internal ID. The list is always sequential and invisible to the user. If bone "6" is deleted, bone "7" becomes bone "6". If you delete bone 7 and it is the last bone in the list, and create a new bone right away, that new bone becomes bone 7.
-vern
I worked in 3D for a while and when I rig a character there, I don't have to pull it apart before I put in the skeleton. That's why it sounds a bit weird to me. There are some neat tools to control the weighting of the bones on the vertices like tables where you can manually enter values to completely control the rigging proces. Anyway, if this is the way moho works then that's totally fine with me. Just had to get used to the idea. Thanks for the explanation Heyvern!
I used 3D software with bone rigs for years. This is a walk in the park by comparison. One less dimension to worry about. 
It isn't so weird once you get use to it. And there are only a few parts that need to be offset in a basic setup:
The arms and legs
The head
Occasionally I offset the hands but only if they have a lot of finger bones that might be effecting the other parts of the mesh.
Another thing is you don't have to offset individual bones one at a time. If you offset the parent of a long chain (shoulder, bicep, forearm, hand) all the children come along for the ride. No need to offset them.
So with a bipedal character in a simple rig you are only offsetting 4 or 5 bones. 2 Shoulders, 2 thighs, 1 head.
Another thing I like about bone offset. You can create "sub" flexi-bound rigged areas. For instance you could pull the mesh of the bottom part of a dress away from the influence of other body bones. Apply a series of bones to that portion to control cloth like movement. Offset that dress area back to the body.
Now you have independent control of the dress or clothing that is still part of the rig and in the right spot. You don't have to spend effort individually binding points to bones since those bones are off in another area and use the default flexi-binding. The separate bones controlling the dress are still children of the body or hip bone. So they follow along just as before.
If repositioning of the body parts back are an issue, I always build my characters "in place" as they would appear in a final image. I then render that and use it as a guide to put the character back together again after pulling it apart for bone offset. Piece of cake.
-vern

It seems so. In the job I'm doing right now I have to change rigs a lot, with sometimes odd behaviour as a result. If a level is totally fucked up, I just select all shapes and paste them into a new vector layer, then create a new bone layer and start from scratch. This has worked every time.Does MOHO somehow remember the influence of the old bone and put them on the new bone?
As for offsetting bones: my current character sits on a bike and is seen from the front. The setup grew and now looks like this:
bike+guy group
- left hand
- right hand
- bike
- guy group
- - guy bones
- - - nose+glasses
- - - eye group
- - - - left eye group
- - - - - eye outline
- - - - - lids
- - - - - pupils
- - - - - eye mask
- - - - right eye group
- - - - - eye outline
- - - - - lids
- - - - - pupils
- - - - - eye mask
- - - mouth switch
- - - - mouth shape
- - - - mouth shape
- - - face+body
- - - right arm
- - - left arm
- - - legs
- - arm bones
- - - right arm
- - - left arm
- - leg bones
- - - legs
background
Sometimes it gets even more complicated, like when I needed independent movement of jaw, tongue and lips (masking fun!). The nice thing: every separate level is a separate timeline, and when I fuck it up I can safely erase the junk without spoiling everything else. The bad thing: if I need to shift everything in time, I have to do it in every level. But overall I feel very comfortable with this setup. Blinks are independent from pupil's movements, I can do a lot of stuff with the body and still every level follows, and adding an overall bike vibration is child's play.
You'll notice the doubled legs and arms. The second bone rig for each doesn't start at the sholder but at the wrist, reversing the bone hierarchy. (Same for the legs.) I found this very useful for big movements of the body where the hands or feet stay fixed to the bike, at least much easier to work with than with locking/unlocking bones. Much faster work, since it is so easy to just duplicate a layer or a whole group, erase all bones and create new ones.
Thanks for the reply. I think I am getting the hang of the whole rigging part. I was still wondering if it is possible to set the camera to orthograpic. I tried to sort the shape render order by placing them in 3D space and animate their relative distance. The problem here is that the added perspective brings on a whole new set of problems. The biggest seems to be that all individual parts somehow keep looking at the camera for some reason. For instance, I have this character with all shapes neatly ordered in actuall 3D space. I render it and it looks fine. Now, when I take the character and move it to the far corner of the screen, all individual shapes start popping in front and behind each other as if they all revolve around their own axes, facing the camera. I figured this problem might be avoided by eliminating the persective. Plus, the perspective does things to my model that I don't want stylisticly. Any help would be greatly appreciated.

I never use Complex setups like the one above. When i build a head I have not needed masking yet, just proper plaining and point groups. Then I Duplicate the head and make a bunch of switch layers for common exspretions and then I can to point animation later if need be. I find this looks smoother.
Maybe that is just me.
Maybe that is just me.
If you can get away with a simpler setup, by all means stick to that!
This decision is highly dependant from the design of the characters and the kind of movements required in the scene. Also bear in mind that I have to re-use the characters quite a lot.
To clearify this, take blinking eyes as an example. The complexity of the setup depends on the style.
- simple black circles on plain face colour: eye lids can be one or two shapes on one layer, filled with skin colour, maybe with one dark stroke on the bottom. Blinking is done via level animation or, for some expression, via point animation.
- black circles within white circles: same solution as above for the lids. Masking for the pupils so they can get a bit under the rim of the white.
- black outline around the white: same as above with the addition of an black outline layer because of AS' masking restrictions.
- one eye on top of another (like in 3/4 view): requires the doubled setup, one for each eye.
Eye lids of different skin colour require masking as well.
Glasses or a prominent nose should always be put on a separate level just to get out of the way.
Well, here is a new question. I've been trying to figure out some masking issues. I did some basic masking tutorials, but I haven't been able to find a solution to what I am trying to do. I made a screencap of an example setup.
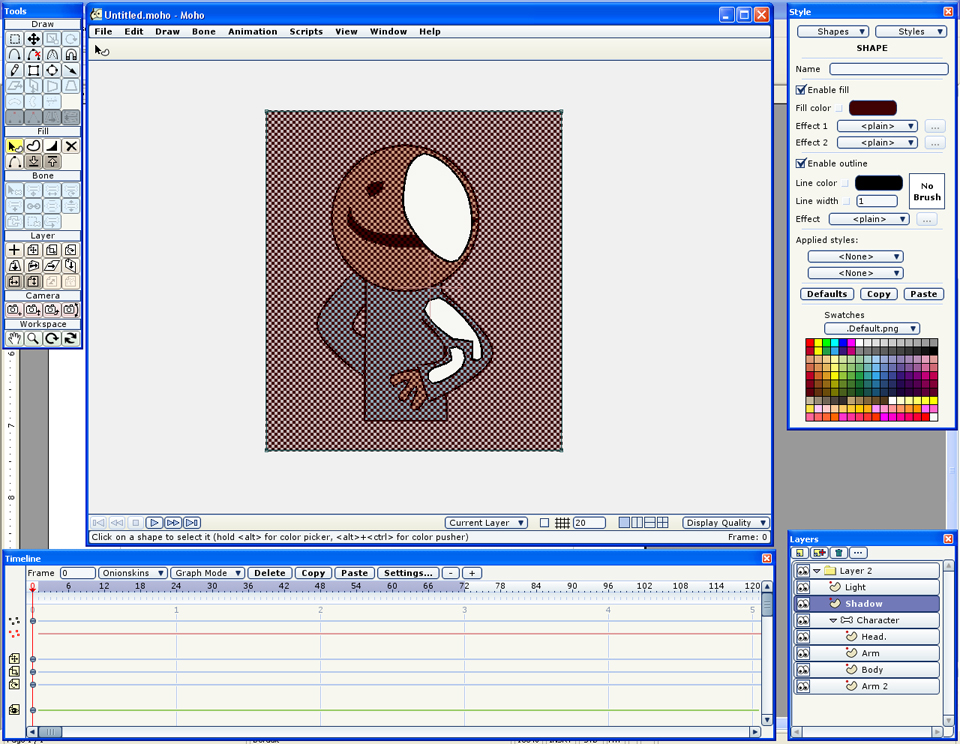
I have a character that I want to add shadow to. The idea was to have two lighting layers, one shadow, that will be multiplied during rendering and one light that actually has to mask a hole in the shadow layer so the original color will show through it. Then, last but not least, the entire character has to mask of the excess shadow color that is outside the character. I hope I made clear what I am trying to do. Could anybody help me out as to what masking settings should I use to get this effect? Thanks for the help!
I have a character that I want to add shadow to. The idea was to have two lighting layers, one shadow, that will be multiplied during rendering and one light that actually has to mask a hole in the shadow layer so the original color will show through it. Then, last but not least, the entire character has to mask of the excess shadow color that is outside the character. I hope I made clear what I am trying to do. Could anybody help me out as to what masking settings should I use to get this effect? Thanks for the help!

I figured out the masking thing myself, but I still don't quite fully understand how it works. Mostly trial and error for me. I have a new problem though. Whenever I draw a line with the freehand tool, not closing the shape, the line vertices keep snapping towards other objects, even while I'm animating. Is there a way to "finalize" a shape, to prevent this from happening?
Another problem I keep having, as soon as I turn on the 3D camera and start animating, all the shapes start to pop in front and behind each other. Am I doing something wrong or is this a common problem with moho? Yes, I'm still using moho...
Another problem I keep having, as soon as I turn on the 3D camera and start animating, all the shapes start to pop in front and behind each other. Am I doing something wrong or is this a common problem with moho? Yes, I'm still using moho...