Stack order technique...

Have you come up with a good Moho trick? Need help solving an animation problem? Come on in.

Moderators: Víctor Paredes, Belgarath, slowtiger

User avatar
funksmaname
Posts: 3174
Joined: Tue May 29, 2007 11:31 am
Location: New Zealand

Stack order technique...

Post by funksmaname »

Hi guys,
I was going to record a tutorial - which i may still do, but i thought if i post a file and a bit of explenation you might be able to put two and two together :P

This is the result - not particularly amazing, but i did it in about 10 minutes for demo purposes:
Image
anme file

Basically this file contains a few of the techniques i use pretty much all the time...

The hole/layer order technique, and the basic shape shading technique.

Have a play with the file... drag the bottom lip around, drag the top eyelid over the bottom one, and move the eyebrows about... its pretty versatile!

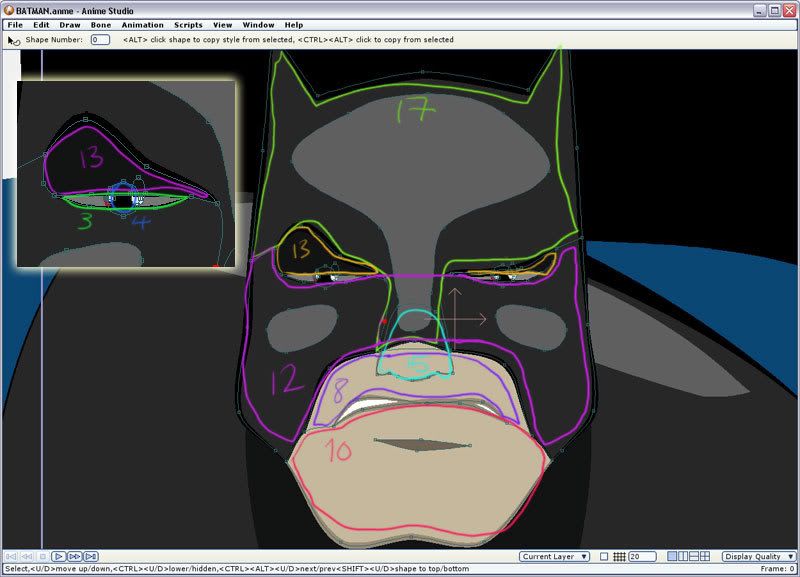
here is the stacking order:
Image

Basically you can see by the numbers, the bottom jaw can go over the opper lip, the forehead can go over the eyes/cheeks, and the nose sits above the cheers but below the forehead...

the zoomed view of the eyes show that the top lid is above the cheeks, so when he blinks the top eyelid can go over the bottom one.

For pupils and anything that goes IN the mouth - you just have to make sure they are above the background fill (in the eyes this is layer 3 - so pupils are 4) but below anything that should be covering them (in the mouth this would be 8 and 10, so as long as the inside of the mouth shape is lower, and any teeth/tongue are higher but below 8/10 it will sit inside the mouth.

I think this is the best way to make eyes and mouth and control overlap... ive tried having lots of seperate shapes but i'm sure you'll agree if you look at the file that the build is quite minimal and clean... you could potentially also split things in half horizontally so that one side is always stacked above the other incase you want to do head turns - but this is a theory i've not yet practiced...

The shape shading is just simple shapes with a soft edge effect... i think this gives a nice effect and you can keep points to a minimum for animation purposes...

I hope you find this useful - as i say, its nothing new, i learned it off Heyvern i think, but i've not seen it documented...

btw, most of these shapes started as a humble square which i them made rounded edges of the points and added/moved more about... Also, so i can control stacking order, i tend not to auto fill anything and fill them when i've planned the order they should go - it can always be changed later, but saves some hassle.

Ask if you need any more clarification :)

p.s. the eyebrows are their own shape - i selected the 4 points and hit space to make the line so it can be on top of everything.
User avatar
dlangdev
Posts: 144
Joined: Wed Jun 13, 2007 10:43 pm
Location: USA
Contact:

Post by dlangdev »

cool, nice presentation.

the look-and-feel is close to book-style tutorial.
User avatar
Mikdog
Posts: 1901
Joined: Tue Jul 05, 2005 3:51 pm
Location: South Africa
Contact:

Post by Mikdog »

Image
User avatar
funksmaname
Posts: 3174
Joined: Tue May 29, 2007 11:31 am
Location: New Zealand

Post by funksmaname »

lmao
Genete
Posts: 3483
Joined: Tue Oct 17, 2006 3:27 pm
Location: España / Spain

Post by Genete »

Funk! Thanks for the tip!
Three things:
1) Your drawing are terribly good. I'm so envious! :twisted:
2) Although you are so happy with 7Feet Select shape add on I strongly recommend to enable auto name shape and bones. You'll appreciate it some day. I always auto name shapes and bones and frequently give its own names to them to know what they are. You can select quicker non clickable shape if it has a name using the Style palette than using the select tool and look for it using UP and DOWN arrows.
3) I've tested the 7Feet replacement and it is a little confusing to me. Also the CTRL+ALT UP or DOWN don't work because I have those key combination already used to change between my desktops (you know, in linux there are 4 desktops by defect and it is its hot keys). If you don't use that tool it is fairly impossible to make use of your tip.

-G
human
Posts: 688
Joined: Tue Jan 02, 2007 7:53 pm

Post by human »

Hey funk,

I haven't digested your tutorial yet, but I can see that it will be extremely, extremely helpful. Thanks so much in advance.

You haven't asked for feedback, but I just wanted to assign you your grade on the art. Sorry, but you only get an A, compared to A+ (or is it A+++++?) for the other three terrific characters.

Here's why: your batface is much heavier on the jowls than than the cheekbones and skull.

Your audience is positively dying for a little more heroics here!!

Can't we have him a wee bit handsomer?

By the way, I see that you're consistent with the idiosyncratic choice of grey for the sclera of the eyes--same as the other characters. It's unorthodox, but it works fine.

The odd thing about this character is his irises are dark cherry in color--I had to zoom in to verify this. Again, this is highly unorthodox, but it works.
User avatar
p6r
Posts: 318
Joined: Fri Aug 20, 2004 5:16 pm
Location: France
Contact:

Post by p6r »

Wowwwwwww...

Very very nice !
You have found YOUR style !!! A very good style !!!!!!!!!!!!!!!!!

Thanks a lot.

6R
User avatar
funksmaname
Posts: 3174
Joined: Tue May 29, 2007 11:31 am
Location: New Zealand

Post by funksmaname »

Thanks guys,
Vern GENETE! - GREAT TIP! i actually had auto name on up until when i reinstalled windows the other day (f***ing popups)... however i didnt know exactly WHY until now! I didnt think of using the pallete menu to select specific shapes, or naming them so they can be easily identified in the drop down list :)

Human, thanks for the feedback, but as i mentioned this isn't really a developed character imo :) i just threw him together out of a few boxes and thats what came out - but thanks for taking the time to analyse him ;)

p6r, thanks :P

I hope someone finds this useful - I didnt really go into shape selection or how to select areas to fill, with areas cut out but the workflow is as follows:

1) select and fill the 'hole' areas, these will need to have the lowest stacking order
2) select them again, and then select the face portion around them - this will leave a face 'shape' with a hole. once you fill that it will be in top of the eyes (so eyes or mouth is stack 1, face is stack 2) and then just order anything that goes in between below the face.

This is the order i usually do things, pupils and mouth inners are usually done a lot after the face is established but you could do them and fill them before you fill the face...
Last edited by funksmaname on Fri Jul 06, 2007 9:18 am, edited 1 time in total.
Genete
Posts: 3483
Joined: Tue Oct 17, 2006 3:27 pm
Location: España / Spain

Post by Genete »

funksmaname wrote:Thanks guys,
Vern - GREAT TIP! i actually had auto name on up until when i reinstalled windows the other day (f***ing popups)... however i didnt know exactly WHY until now! I didnt think of using the pallete menu to select specific shapes, or naming them so they can be easily identified in the drop down list :)
LOL... Vern and I were working together in the 3D stuff but not to the point anybody confuse our names!!!! Hahahahahahaha I hope Vern would be proud to receive all your congratulations, but HEY!! I have an avatar and Vern doesn't!!!
:lol: :lol: :lol: :lol: :lol: :lol:

-G
User avatar
funksmaname
Posts: 3174
Joined: Tue May 29, 2007 11:31 am
Location: New Zealand

Post by funksmaname »

LOL woops... i guess we're even for you calling me fu*k now :lol:
User avatar
heyvern
Posts: 7035
Joined: Fri Sep 02, 2005 4:49 am

Post by heyvern »

I don't have an avatar?

Good grief... I need an avatar don't I?

-vern
User avatar
jahnocli
Posts: 3471
Joined: Fri Oct 29, 2004 2:13 pm
Location: UK

Post by jahnocli »

OK -- now you have an avatar! But it's distracting and disturbing -- and, IMHO, not in a good way! If I have to cover up part of the screen when I'm trying to read something, like with your avatar, then that is a BAD THING...
You can't have everything. Where would you put it?
User avatar
funksmaname
Posts: 3174
Joined: Tue May 29, 2007 11:31 am
Location: New Zealand

Post by funksmaname »

is that you vern?
:lol: i found it quite entertaining...
DarthFurby
Posts: 510
Joined: Sat Jul 29, 2006 1:34 pm
Location: New York City
Contact:

Post by DarthFurby »

Pretty cool technique. I haven't experimented much with welded points/shapes since they don't export to flash very well(if at all), but for raster export this works nicely. I'd like to see a convincing side view head turn with this technique tho, especially the mouth area, but overall very very interesting.
User avatar
heyvern
Posts: 7035
Joined: Fri Sep 02, 2005 4:49 am

Post by heyvern »

jahnocli wrote:OK -- now you have an avatar! But it's distracting and disturbing -- and, IMHO, not in a good way! If I have to cover up part of the screen when I'm trying to read something, like with your avatar, then that is a BAD THING...
Oops! Sorry! I will see what I can do. I used that avatar for years on another forum and had no complaints. I could slow down the animation so it doesn't change as often.

I could never pick one I liked so I used them all. ;)

Yes, that's me.

-vern
Post Reply